এই ব্লগ টি কে আরো বড় করে তুলতে আপনাদের সহযোগিতার প্রয়োজন , আপনাদের প্রতিষ্টানের অ্যাড সহ আপনার দেওয়া নোটস ও মডেল প্রশ্ন পত্র এই ব্লগে দেওয়া হবে | যারা ইচ্ছুক আমাদের সাথে যোগাযোগ করতে পারেন - 9123698214


Issue Excel Commands

o tell a program—any program—what to do, you issue commands. Microsoft Excel gives you many ways to issue commands: clicking the command’s button, using keyboard shortcuts, using the Mini toolbar, using the Context menu, or using dialog boxes, and—if you are using a touch-sensitive screen—touching the screen. Choose the method that is appropriate and seems the most comfortable to you.

The Mouse

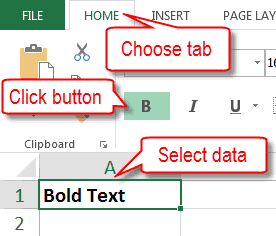
For most of the instructions in this tutorial, I will ask you to click the command button with the mouse. Generally speaking, this method consists of selecting the data or object you want to modify, clicking the tab you want to choose, and then clicking the button on the Ribbon that corresponds to the command you want to issue. If a menu or dialog box appears, continue clicking until you issue the command.
the mouse
If you are using a touchscreen, follow the same steps, using the touchscreen-equivalent to clicking with the mouse.

Keyboard Shortcuts

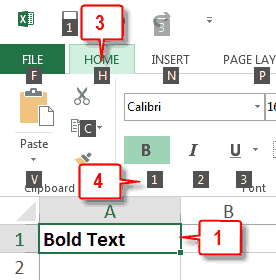
A keyboard shortcut is a predefined series of key presses that allow you to issue a command without taking your hands off the keyboard. Start a keyboard shortcut by pressing the Alt key; then press the letter or number that appears next to the appropriate Quick Access toolbar or Ribbon option. Either the command is issued or another set of letters and numbers appears. If another set of letters and numbers appears, keep pressing letters or numbers until you issue the command.
Use a Keyboard Shortcut
the mouse
  1. Select the item on which you want to perform an action.
  2. Press the Alt key. Letters and numbers representing each command appear.
  3. Press the letter or number that represents the command you want to issue.
  4. Press additional letters and numbers, if necessary. Excel executes the command.

Shortcut Keys

In addition to keyboard shortcuts, Excel has a list of predefined shortcut keys. With these, select the text or object you want to apply a command to and then press the key combination; Excel issues the command. For example, the command Ctrl+B bolds; so, if you want to bold, select the text and then hold down the Ctrl key while you press the letter b.

The Mini Toolbar and Context Menu

The Mini toolbar and Context menu give quick access to frequently used commands. They appear whenever you right-click in the worksheet. The Mini toolbar and Context menu are context sensitive. That means what appears on them depends on what you are working on at the time. For example, what appears on the Mini toolbar when you are working on text differs from what appears on the Mini toolbar when you are working on an image.

Use the Mini Toolbar and Context Menu
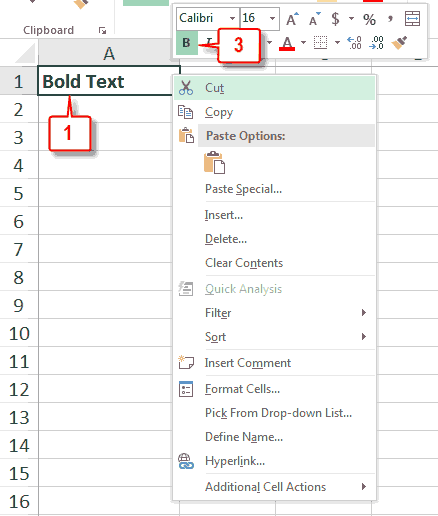
the mouse
  1. Select the data or object on which you want to perform an action.
  2. Right-click. The Mini toolbar and Context menu appear.
  3. Click the button or menu item that represents the command you want to issue.
  4. Click additional options, until Excel executes the command you want to execute, if necessary.

Dialog Box Launchers

In the bottom-right corner of a command group, you may see a dialog box launcherlauncher.  Click the dialog box launcher launcher to open a dialog box or pane where you can issue commands. Generally, more sophisticated and less frequently used commands appear in dialog boxes.
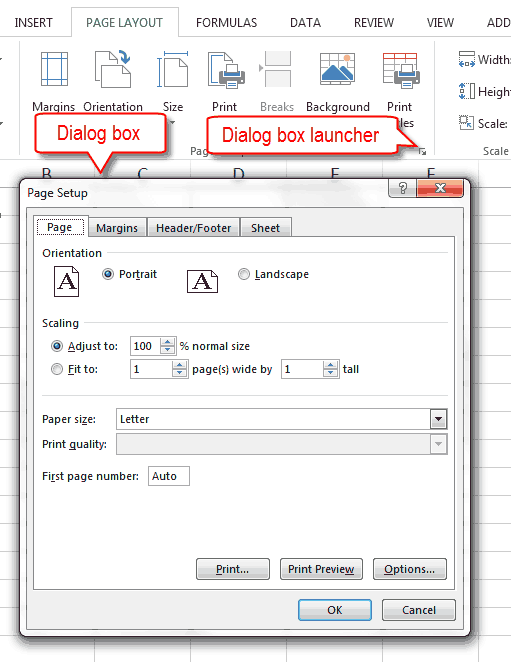
dialog box launcher

Backstage View

Microsoft Excel has two parts: the Excel Window and Backstage view. Use the Excel Window to create and edit your worksheet. Use Backstage view to manage files. Click the File tab, located in the upper-left corner of the of the Excel window, to go to Backstage view where you can open a new file, open an existing file, save a file, print a file, set Excel options, and perform other tasks. To return to the Excel window, click the back-arrow in the upper-left corner or press the Esc key.

Go to Backstage View
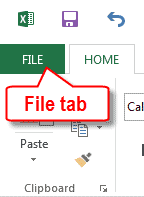
file tab
Choose the File tab. Excel moves to Backstage view.

Return to the Excel Window

Press the Esc key. Excel moves to the Excel window.
Or
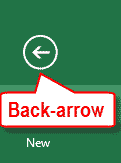
back arrow
Click the back-arrow. Excel moves to the Excel window.
Move around an Excel Worksheet

As you work in Excel, you will need to move around. In this section, I will explain how to move around an Excel worksheet.
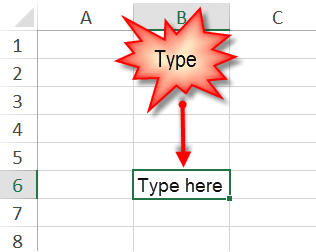
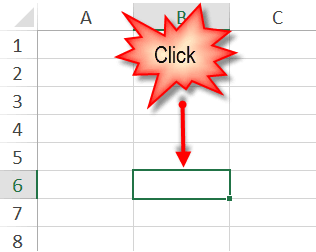
Move to a Specific Cell: If you want to move to a specific cell, click that cell. Then, if you want to insert data, begin typing.
move around excel -- click
Move around excel -- type in cell
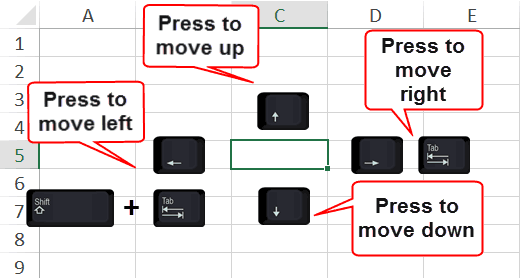
Move around a Worksheet One Cell at a Time: Use the arrow keys on your keyboard to move around your Worksheet. Use the Down-Arrow key to move down. Use the Up-Arrow key to move up. Use the Right-Arrow key or the Tab key to move right. Use the Left-Arrow key or hold down the Shift key while you press the Tab key to move left.
Move around excel -- arrow keys
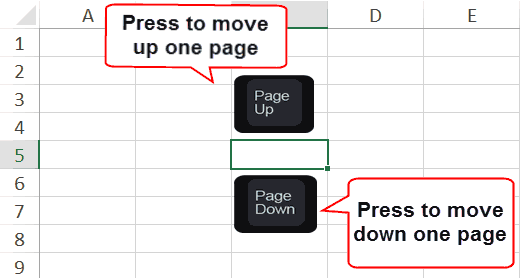
Move Up or Down One Page at a Time: Use the Page Up key on your keyboard to move up one page at a time. Use the Page Down key on your keyboard to move down one page at a time.
Move around excel -- page up page down
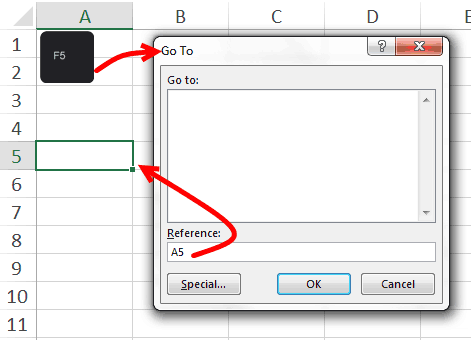
Go to: The F5 function key is the "Go To" key. When you press the F5 key, the Go To dialog box opens and prompts you for the cell to which you want to go. Type the cell address in the Reference field, click OK, and Excel jumps to that cell. For example, if you want to go to cell A5, press F5, type A5 in the Reference field, and then press OK.
Move around excel -- go to
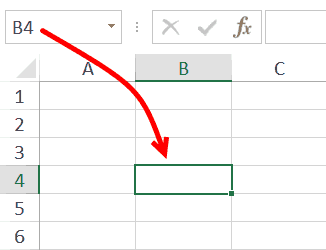
Name Box: The name box is located on the far right side of the Formula Bar. You can use it to go to a specific cell. Just type the cell you want to go to and then press Enter. For example, if you want to go to cell B4, type B4 in the Name box and then press Enter.
Move around excel -- name box
Shortcut Keys
Ctrl + HomeMoves to the beginning of the worksheet—cell A1
Ctrl + EndMoves to the farthest used cell in the worksheet
HomeMoves to the first cell in the current row
Ctrl + Page UpScrolls one screen to the right
Ctrl + Page DownScrolls one screen to the left
Ctrl + GOpens the Go To dialog box

The Excel Ribbon

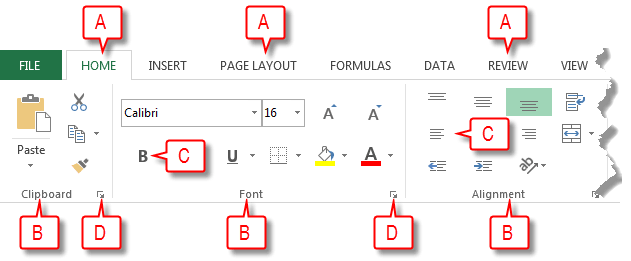
You use commands to tell Microsoft Excel what to do. In Microsoft Excel 2013, you can use the Ribbon to issue commands. The Ribbon is located near the top of the window, below the Quick Access toolbar and the Title bar.
the ribbon
A Tabs: At the top of the Ribbon are several tabs. Clicking a tab displays several command groups.
B Command Groups: A command group is a group of related command buttons. Each tab has several command groups.
C Command Buttons: You click command buttons to issue commands or to access galleries, menus, and dialog boxes. Galleries, menus and dialog boxes provide additional options and/or commands.
D Dialog Box Launcher: You may find a dialog box launcher in the bottom-right corner of a command group. Click the dialog box launcher to see additional commands in a dialog box or pane.

Galleries

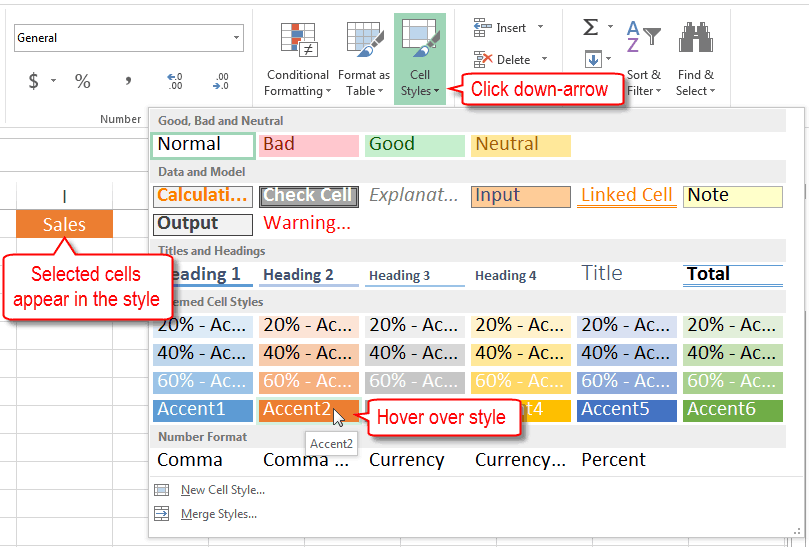
When you select a Ribbon option, Excel may present a gallery. A gallery is a set of options. When you hover over a gallery option, Excel provides a live preview of how your worksheet will appear if you select that option. For example, if you click the down-arrow associated with the Cell Styles, Excel presents a gallery. If you hover over a style, any cells you have selected appear in that style. If you select the style, Excel reformats your selection.
galleries

Pin the Ribbon

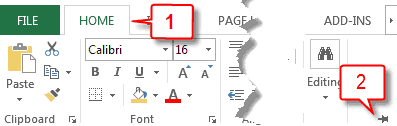
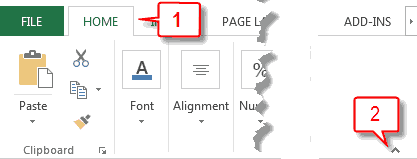
As you work, the Ribbon can be either pinned or unpinned. When the Ribbon is pinned, tabs and command groups are visible, When the Ribbon is unpinned, you can see the tabs but not the command groups—when you click a tab, the command groups appear.

Pin the Ribbon

pin the ribbon
  1. Choose any tab. The Ribbon appears.
  2. Click the pin in the lower-right corner of the Ribbon. Excel pins the Ribbon and you can see the command groups.
    Note: The pin only appears when the Ribbon is unpinned.
pinned ribbon

Unpin the Ribbon

unpin the ribbon
  1. Choose any tab. The Ribbon appears.
  2. Click the chevron in the lower-right corner of the Ribbon. Excel unpins the Ribbon and you can see the tabs but not the command groups. When you click a tab, the command groups appear.
    Note: The chevron only appears when the Ribbon is unpinned.
unpinned ribbon

Are there other ways to pin and unpin the Ribbon?

Yes. Right-click on the Ribbon, then on the menu that appears, click Collapse the Ribbon. If the Ribbon is pinned, clicking this option will unpin it. If the Ribbon is unpinned, clicking this option will pin it.
Here is another way. If the Ribbon is unpinned, hold down the Ctrl button and press F1 at the same time to pin the Ribbon—this is usually written as Ctrl+F1; if the Ribbon is pinned, hold down the Ctrl button and press F1 at the same time to unpin it.

How do I use the Ribbon Display Options Button?

The Ribbon Display Options Button is located in the upper right corner of the Excel Window, next to the help button. This button provides options similar to pinning and unpinning the Ribbon. When you click the Ribbon Display Options button, the following options appear: Auto-hide Ribbon, Show Tabs, and Show Tabs and Commands. If you select Auto-hide Ribbon the Ribbon will disappear. Click the top left side of the window or click the triple dots in the upper-right corner to display the Ribbon and the command groups. Click anywhere in the worksheet to hide the Ribbon. If you select Show Tabs, only the Ribbon tabs will display. Click a tab to display the command groups. This is the same as unpinning the ribbon. If you select Show Tabs and Commands, both the tabs and the commands will display at all times. This is the same as pinning the Ribbon.

How can I find out what each button on the Ribbon does?

When you hover over a button, Excel displays the name of the button, a description of the button’s function and if a shortcut key is associated with the function, Excel displays the shortcut key.
If you do not see a button name and/or a description, the setting that causes the button name and/or description to display is turned off. To turn these features on: 1) Choose the File tab. A menu appears along the left side of the window. 2) Click Options. The Excel Options dialog box opens. A menu appears along the left side of the dialog box. 3) Choose General. 4) Under User Interface Options, click the down-arrow next to the ScreenTip Style field. Excel presents the following options: Show Feature Descriptions in ScreenTips, Don’t Show Feature Descriptions in ScreenTips, and Don’t Show ScreenTips. Click the option you want—for a description of each option, see the following ScreenTip Styles table. 5) Click OK to make your changes and close the dialog box.
ScreenTip Styles
OptionDescription
Show Feature Descriptions in ScreenTipsDisplays the button name and a description of the button’s function
Don’t Show Feature Descriptions in ScreenTipsDisplays the button name but does not display a description of the button’s function

The Excel 2016 Window

When you open an Excel worksheet, you are presented with the Excel window. You use this window to interact with the software—you type your data into the window and you use the window to tell Excel what to do. In this section, I will explain the parts of the Excel window.
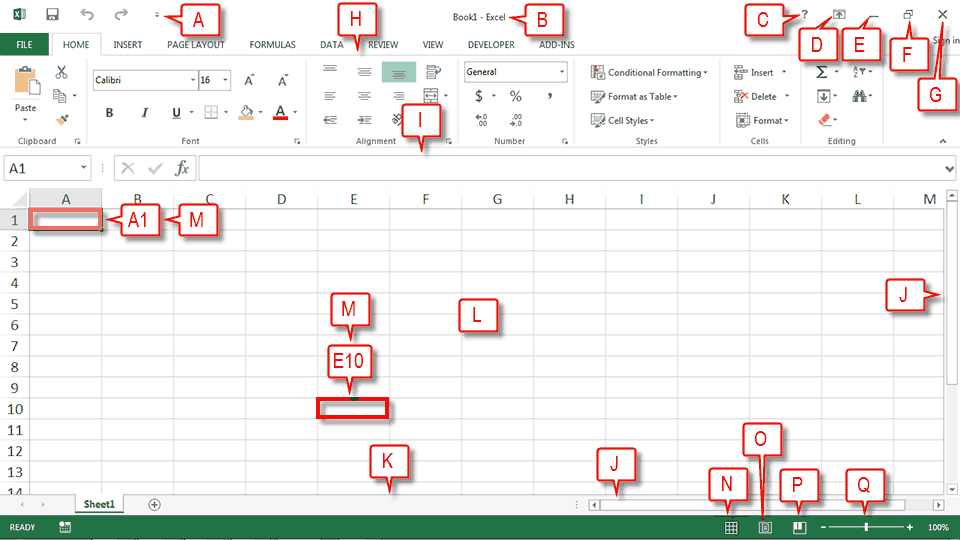
Quick Access Toolbar: In the upper-left corner of the window is the Quick Access toolbar, sometimes referred to as the QAT. The Quick Access Toolbar provides commands you frequently use. Save, Undo, and Redo appear on the toolbar by default. Click Save to save your file, Undo to roll back an action you have taken, and Redo to reapply an action you have rolled back.
B Title Bar: In the top center of the window to the right of the Quick Access toolbar is the Title bar. The Title Bar displays the title of your workbook. Excel names the first new workbook you open Book1. As you open additional new workbooks, Excel names them sequentially. When you save a workbook, you assign the workbook a new name.
C Help Button help button : The Help button, along with several other buttons, is located in the upper-right corner of the window. It takes you to the Excel help area. In the help area, you can search for information on how to perform tasks.
D Ribbon Display Options Button ribbon display options : The Ribbon Display Options button is located next to the Help button. Use it to display the following menu options: Auto-hide Ribbon, Show Tabs, and Show Tabs and Commands. To learn more about these options, see the section The Excel Ribbon.
E Minimize Button minimize button : The Minimize button is located next to the Ribbon Display Options button. To remove Excel from view and place the Excel icon on the Windows taskbar, click the Minimize button. To restore Excel, click the Excel icon on the Windows taskbar.
excel window
F Restore Down restore down : The Restore Down button is located next to the Minimize button. The Restore Down button reduces the size of the Excel window. When you click the Restore Down button, it turns into the Maximize button.
Maximize Buttonmaximize button: The Maximize button fills your screen with the Excel window. When you click the Maximize button, it turns into the Restore Down button.
G Close Button close button : The Close button is located in the far right corner of the Excel window. It closes the active workbook. When you click the Close button, if you have not previously saved your workbook or if you have made changes to your workbook since you last saved, a dialog box opens. Click Save if you want to save your changes, Don’t Save if you do not want to save your changes, or Cancel if you have decided not to close your workbook. If the workbook you are closing is the only workbook open, the Close button also closes Excel.
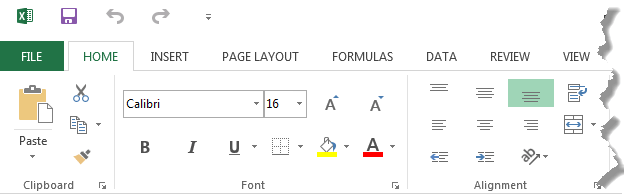
H Ribbon: To tell software what to do, you issue commands. In Excel, you can use the Ribbon to issue commands. The Ribbon is located below the Title bar. To learn more about the Ribbon, see the section The Excel Ribbon.
excel ribbon
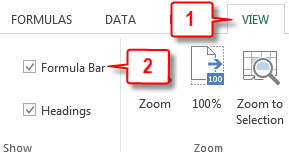
I Formula Bar: Optionally, the Formula Bar is found below the Ribbon. Use the Formula Bar to enter and edit data. If your Formula Bar is not visible, follow the steps listed here:

Display the Formula Bar

show formula bar
  1. Choose the View tab.
  2. Click Formula Bar in the Show group. Excel displays the Formula Bar.
formula bar
J Vertical and Horizontal Scroll Bars: You can move up, down, and across your window by dragging the icon located on a scroll bar. The vertical scroll bar is located along the right side of the window. The horizontal scroll bar is located just above the Status bar. To move up and down your worksheet, click and drag the icon on the vertical scroll bar up and down. To move back and forth across your workbook, click and drag the icon on the horizontal scroll bar back and forth.
K Status Bar: The Status bar appears at the very bottom of the window and provides information such as the sum, the average, and the count of selected numbers. You can change what displays on the Status bar by right-clicking on the Status bar and selecting the options you want from the Customize Status Bar menu. A check mark next to an item means it is selected. You click an unselected menu item to select it. You click a selected menu item to unselect it.
L Worksheet: Just below the Formula Bar is your worksheet. This is where you enter your data. Each worksheet contains columns and rows. The columns are lettered starting with A to Z and then continuing with AA, AB, AC and so on. The rows are numbered starting with one. Only your computer memory and your system resources limit the number of columns and rows you can have in a worksheet.

M Cells: Worksheets are divided into cells. The combination of a column coordinate and a row coordinate make up a cell address. You refer to cells by their cell address. For example, the cell located in the upper left corner of a worksheet is call cell A1, meaning column A, row 1. Column E10 is located under column E on row 10. You enter your data into the cells on the worksheet.
N Normal Button normal button : The Normal button formats your worksheet for easy data entry.
O Page Layout Button page layout button : The Print Layout button displays your workbook in such a way as to make it easy for you to assign printing options and to see how your worksheet will look when printed.
P Page Break Preview page break preview button : The Page Break Preview button displays your workbook and shows where each page begins and ends.
Q Zoom Slider and Zoom: The Zoom slider zooms in and out on your workbook. Dragging the slider to the left zooms out, makes your workbook smaller, and allows you to see more of your workbook. Dragging the slider to the right zooms in, makes your workbook larger, and reduces the amount of your workbook you can see. The Zoom slider appears on the Status bar if Zoom Slider is selected on the Status bar menu. The percentage of zoom appears to the right of the zoom slider, if Zoom is selected on the Status bar menu.

Lesson 5: Adding Bullets and Numbers, Undoing and Redoing, Setting Page Layouts and Printing Documents


If you have lists of data, you may want to bullet or number them. When using Microsoft Word, bulleting and numbering are easy. The first part of this lesson teaches you to bullet and number. After you have completed your document, you may want to share it with others. One way to share your document is to print and distribute it. However, before you print you may want to add page numbers and tell Word such things as the page orientation, the paper size, and the margin setting you want to use. In this lesson you will learn how to layout and how to print your documents.

  1. Add Bullets and Numbers
  2. Undo and Redo
  3. Set the Orientation
  4. Set the Page Size
  5. Set the Margins
  6. Add Page Numbers
  7. Insert Page Breaks
  8. Preview and Print Documents

If you have lists of data, you may want to bullet or number them. When using Microsoft Word, bulleting and numbering are easy. The first part of this lesson teaches you to bullet and number.
After you have completed your document, you may want to share it with others. One way to share your document is to print and distribute it. However, before you print you may want to add page numbers and tell Word such things as the page orientation, the paper size, and the margin setting you want to use. In this lesson you will learn how to layout and how to print your documents.

Add Bullets and Numbers

In Microsoft Word, you can easily create bulleted or numbered lists of items. Several bulleting and numbering styles are available, as shown in the examples. You can select the one you wish to use.
EXAMPLES: Numbering
Numbering
EXAMPLES: Bulleting
Bulleting

EXERCISE 1

Bullets

Bullets
  1. Type the following list as shown:
    Apple 
    Orange 
    Grape 
    Mango 
    Cherry
  2. Select the words you just typed.
  3. Choose the Home tab.
  4. In the Paragraph group, click the down arrow next to the Bullets button Bullets button. The Bullet Library appears.
  5. Click to select the type of bullet you want to use. Word adds bullets to your list.
    Note: As you move your cursor over the various bullet styles, Word displays the bullet style onscreen.
To remove the bulleting:
  1. Select the list again.
  2. Choose the Home tab.
  3. In the Paragraph group, click the down arrow next to the Bullets icon. The Bullet dialog box appears.
  4. Click None. Word removes the bullets from your list.

Numbers

Numbers
  1. Type the following list as shown:
    Apple 
    Orange 
    Grape 
    Mango 
    Cherry
  2. Select the words you just typed.
  3. Choose the Home tab.
  4. In the Paragraph group, click the down arrow next to the Numbering button Numbers Button. The Numbering Library appears.
  5. Click to select the type of numbering you want to use. Word numbers your list.
    Note: As you move your cursor over the various number styles, Word displays the number style onscreen.
To remove the numbering:
  1. Select the list again.
  2. Choose the Home tab.
  3. In the Paragraph group, click the down arrow next yo the Numbering icon. The Number dialog box appears.
  4. Click None. Word removes the numbering from your list.

Undo and Redo

You can quickly reverse most commands you execute by using Undo. If you then change your mind again, and want to reapply a command, you can use Redo.

EXERCISE 2

Undo and Redo

Undo and Redo
  1. Type Undo example.
  2. Click the Undo button on the Quick Access menu. The typing disappears.
  3. Click the Redo button on the Quick Access menu. The typing reappears.
  4. Select "Undo example."
  5. Press Ctrl+b to bold. Word bolds the text.
  6. Press Ctrl+i. Word italicizes the text.
  7. Press Ctrl+u Word underlines the text.
  8. Click the down arrow next to the Undo icon. You will see the actions you performed listed. To undo the underline, click Underline; to undo the underline and italic, click Underline Italic; to undo the underline, italic, and bold click Bold etc.
  9. To redo, click the Redo icon several times.

Alternate Method -- Undo & Redo by Using Keys

  1. Type Undo example.
  2. Press Ctrl+z. The typing disappears.
  3. Press Ctrl+y. The typing reappears.
  4. Select "Undo example."
  5. Press Ctrl+u to underline.
  6. Press Ctrl+z. The underline is removed.
  7. Press Ctrl+y. The underline reappears.

Set the Orientation

Before you print your document, you may want to change the orientation of your pages. There are two orientations you can use: portrait and landscape. Paper, such as paper sized 8 1/2 by 11, is longer on one edge than it is on the other. If you print in Portrait, the shortest edge of the paper becomes the top of the page. Portrait is the default option. If you print Landscape, the longest edge of the paper becomes the top of the page.
Portrait

Landscape
The exercises that follow use a file named SamplePrint.docx. Right click here to download the file. Click Save Target As from the menu that appears, and save the linked file to a directory on your computer. The file will download as a zip file. A zip file is a file that is compressed. Compressed files are smaller and easier to download. To open the file:
  1. Open the folder you downloaded the file to.
  2. Right-click on the file name.
  3. Click Extract All on the menu that appears. The Extract Compressed (Zipped) Folders dialog box appears.
  4. Enter the folder you want to put the file in or except to suggested location.
  5. Click Extract. Windows Explorer extracts the file.
  6. You can use Microsoft Word to open the file.

EXERCISE 3

Set the Orientation

Set the Orientation
  1. Choose the Page Layout tab.
  2. Click Orientation in the Page Setup group. A menu appears.
  3. Click Portrait. Word sets your page orientation to Portrait.

Set the Page Size

Paper comes in a variety of sizes. Most business correspondence uses 8 1/2 by 11 paper which is the default page size in Word. If you are not using 8 1/2 by 11 paper, you can use the Size option in the Page Setup group of the Page Layout tab to change the Size setting.

EXERCISE 4

Set the Page Size

Set the Page Size
  1. Choose the Page Layout tab.
  2. Click Size in the Page Setup group. A menu appears.
  3. Click Letter 8.5 x 11in. Word sets your page size.

Set the Margins

Margins define the amount of white space that appears at the top, bottom, left, and right edges of your document. The Margin option in the Page Setup group of the Page Layout tab provides several standard margin sizes from which you can choose.

EXERCISE 5

Set the Margins

Set the Margins
  1. Choose the Page Layout tab.
  2. Click Margins in the Page Setup group. A menu appears.
  3. Click Moderate. Word sets your margins to the Moderate settings.

Add Page Numbers

Page numbers help you keep your document organized and enable readers to find information quickly. You can add page numbers to the top, bottom, or margins of your pages, and you can choose where the numbers appear. For example, numbers can appear at the top of the page, on the left, right, or center of the page. Word also offers several number styles from which you can choose.

EXERCISE 6

Add Page Numbers

Add Page Numbers
  1. Choose the Insert tab.
  2. Click the Page Number button in the Header & Footer group. A menu appears.
  3. Click Bottom of Page.
  4. Click the right-side option.

Insert Page Breaks

As you learned in Lesson 1, you can display your document in any of five views: Draft, Web Layout, Print Layout, Full Screen Reading, or Online Layout. In Print Layout view you see your document as it will appear when you print it. You can clearly see where each page ends and a new page begins.
As you review your document, you may find that you want to change the point at which a new page begins. You do this by inserting a page break. For example, if a page heading appears on one page and the first paragraph under the heading appears on the next page, you may want to inser a page break before the heading to keep the heading and the first paragraph together.

EXERCISE 7

Change to Print View

Change to Print View
  1. Choose the View tab.
  2. Click Print Layout in the Document Views group. Your document changes to the Print Layout view.

Insert Page Breaks

Insert Page Breaks
  1. Place your cursor before the D in "Displaced Homemakers"
  2. Choose the Insert tab.
  3. Click Page Break. Word places a page break in your document.
To delete a page break, you select the page break and then press the Delete key

Preview and Print Documents

When you have your margins, tabs, and so on the way you want them, you are ready to print. In Word, You can preview your document before you print. In the Preview mode, you can review each page, view multiple pages at the same time, zoom in on a page, and access the Size, Orientation, and Margin options.
If you press the Zoom button while you are in Preview mode, the Zoom dialog box appears. In the Zoom dialog box you can set the sizes of the pages that display as well as the number of pages that display.
When you are ready to print, you use the Print dialog box. In the Print Range area, choose All to print every page of your document, choose Current Page to print the page you are currently on, or choose Pages to enter the specific pages you want to print. Type the pages you want to print in the Pages field. Separate individual pages with commas (1,3, 13); specify a range by using a dash (4-9).

EXERCISE 8

Print Preview

  1. Click the Microsoft Office button. A menu appears.
  2. Highlight the Print option. The Preview and Print the Document menu appears.
  3. Click Print Preview. The Preview window appears, with your document in the window.
  4. Click One Page to view one page at a time. Click Two Pages to view two pages at a time.
  5. To view your document in normal size, click 100%.
  6. Click the Zoom Button. The Zoom dialog box appears.
  7. Select an option and then click OK. Perform this task for each option and note the results.
Note: As you review your document, if you see changes you would like to make to the layout, use the Margin, Orientation, or Page Size options to make the changes. If you want to make other types of changes to your document, click the Close Print Preview button, to return to your document. Once you are satisfied with your document, you are ready to print.

Print

  1. Click the Print button. The Print dialog box appears.
  2. Click the down arrow next to the Name field and select the printer to which you want to print.
  3. Choose All as the page range.
  4. Click OK. Word prints your document.
You have completed Lesson 5. You can save your document and close Word.